Minecraft Minecraft mods, or extensions, can be enjoyed for free by anyone who has the JAVA version of Minecraft.
Our second grader son is addicted to mods and plays with various mods.
However, it was difficult for my child to complete all the settings by himself.
There may have been a smarter and better way to do this, but here is how our family did the mod installation.
Use tools to make the mod work.
Usually, to install and play with mods, you have to install the JAVA version of Minecraft, then install the forge to match the version, put the files in the desired location, and so on, which is a complicated process.
Preparation for installing mods
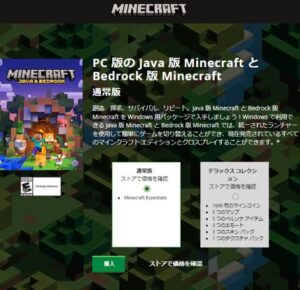
1.Buy Minecraft Java Edition
The JAVA version of Minecraft was available in 2022 for 3,000 Japanese yen.
You can download it from
I later purchased the Switch version of Minecraft, but since the Switch version of Minecraft does not allow playing with mods, I mainly play on my PC.
However, the switch version of Minecraft is easy to play on the go.
To play the mod, you need the Java version of Minecraft and Forge
and move the mod into place.

By the way, GD Launcher is free to use.
1.Press the Download button to download the GD Launcher.

3.Log in with your Microsoft account
If you don’t have one, it’s free, so create an account!
4.Decide which version of the mod you want to include.
In my son’s case, he watched youtube and found “I want to play with this mod!
So, I went to the mod distribution place listed in the summary section of the youtube video and GET the jar file.
5.Match the version of the distributed jar file with the version of FORGE and install
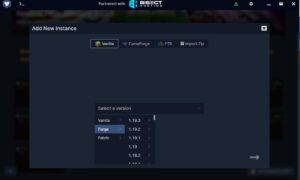
First, create a folder for the version of FORGE you wish to include. The folder is automatically generated, so you only need to select it from the pull-down menu.
Click the “+” button in the lower left corner to add a folder, and leave “Vanilla” as default.
Select the version of FORGE you want to include from the “Select a version” pull-down menu below.
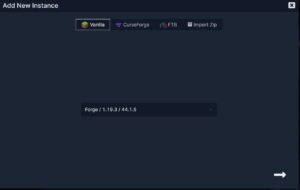
Press the arrow in the lower right corner after selecting the FORGE version
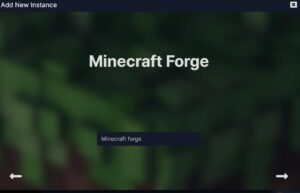
Name it and press the arrow on the bottom right again to create a folder on the TOP screen.
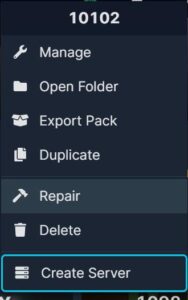
Right-click on the resulting file and select “Manage
Select “Mods” in the left section and press the file symbol

Store the jar file in the opened folder
Finally, launch Minecraft from the GD launcher.
That’s it!
By the way, if you close the GD Launcher once and then launch Minecraft, you are less likely to get an error.
Key to smooth operation of the mod
It is to match the version of Forge with the version of the mod you want to include.
Since it had failed so many times before…
Thus, you can enjoy Minecraft with mods by simply matching the version of FORGE in the GD launcher and putting the same version of the JAR file in the mod file.
Please install mods at your own risk!
The words that come up, like FORGE and jar file, may be difficult, but even I could do it, so any mom with a Minecraft-loving kid in elementary school should give it a try!

